


In the first post we explored a preview of Anthos GKE running on AWS, and some of the use cases and functionality it brings to the Amazon Web Services platform. Now we will dive in with step-by-step instructions (no-frills) on how to set it up.
To simplify Google’s online instructions, I have rewritten some of the commands to make it less fragmented and eliminated some manual point-and-click steps. The Anthos product team is working to fold even more steps into the CLI to further simplify the setup so it will only get easier over time so expect some of these to change.
This is the second of a 3-part series which will explore Google’s Anthos GKE:
- Part 1: Preview of Anthos GKE running on AWS
- Part 2: Step-by-step installation instructions
- Part 3: GKE cluster workloads interacting with AWS services
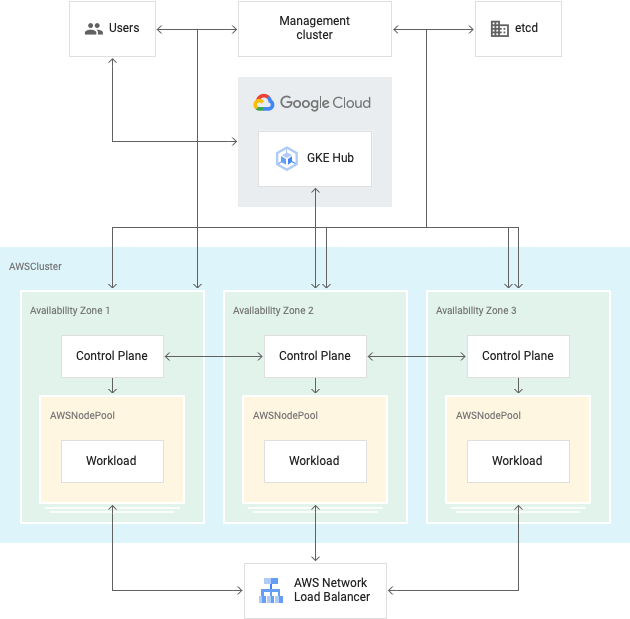
Architecture
Prerequisites
- Active Google Cloud Platform (GCP) account with Anthos (trial) enabled
- Active Amazon Web Services (AWS) account
- Terminal on your local machine or access to a remote terminal
- JQ installed for CLI parsing of JSON
- Terraform CLI installed [optional] for running TF commands
TL;DR
There are four main steps we will cover with separate scripts that highlight the tasks of each step:
- Create keys and IAM roles in both AWS and GCP and download and install the anthos-gke CLI (you currently must be approved by Google for the download step so talk to your account manager asap).
- Configure your management cluster (control plane), bootstrap the Terraform scripts that will create it, and run Terraform to set up AWS and install the control plane.
- Leverage Terraform to bootstrap your first cluster config, tunnel to your AWS bastion, and run kubectl to create your first cluster (cluster-0).
- Add ClusterRoleBinding to cluster and generate auth token and connect the GCP Cloud Console to your new cluster to centralize monitoring and admin.
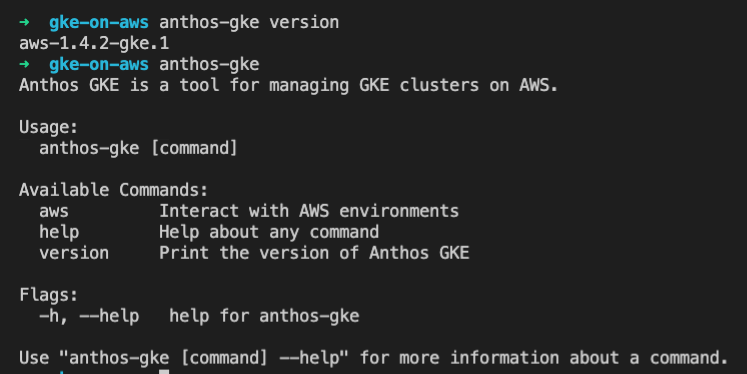
1. Initial setup of keys and Anthos CLI download
You may prefer to just copy/paste the tasks above into your terminal and run them one at a time (recommended for first attempt to ease debugging). Once you have completed them, you should be able to run the following commands and see similar output below.
2. Create a management cluster (control plane)
Once you run the anthos-gke init and apply commands, the CLI will proceed to generate Terraform code that will appear in your working directory and apply the code to build up your infrastructure on AWS. It then installs the management cluster (control plane).
Note: if you have any issues, you can simply leverage the Terraform scripts and use the Terraform CLI to re-apply your settings.
3. Create your first cluster
If you made it this far, congratulations! Technically everything is set up now and from here you can leverage the custom resource definitions (CRDs) for AWSCluster and AWSNodePool to create clusters and node pools as you see fit.
The generated Terraform code has some outputs available that generate a manifest you apply to the control plane, and the GKE management cluster will provision your new cluster.
Tip: Inspect the generated cluster-0.yaml file that Terraform outputs. Before applying the manifest you may want to reduce the min/max node settings to reduce cloud spend. You can learn more about the Anthos GKE Architecture on Google’s site.
Pro tip: use the watch command and monitor status until “Provisioned”.
4. Connecting your cluster to the GKE Hub
Once you generate your token and copy it to the clipboard, return to the GCP console and click “Login” for the cluster, select “Token” and paste in token.
Congratulations!
If you made it this far then pat yourself on the back. The tasks are actually not that cumbersome and I’ve included some env vars atop each script in case they were run separately. If you copy/paste the commands in a single shell, you can skip bastion/proxy/context tasks in each file and easily set up and authenticate clusters.
Next steps
In the next article, we will explore how to deploy workloads to your cluster and interact with other AWS services.
Please check back here for a link when it’s available, or optionally follow me to stay informed of my new posts. You may also visit our https://blog.doit.com site to read our various articles.